Saturday, October 27, 2012

My Sebaceous Cyst

Several years ago I noticed a bump on the top of my head. It was strange. It felt hard to the touch, and it was embarrassing when my hairdresser could feel it. It didn't hurt. It was just a weird bump on my head.

When I went to the doctor about something else a year and a half ago, I asked her to look at my bump. She said it was a sebaceous cyst. Nothing to worry about. She measured it. It was 1 cm in diameter.

Time passed, and the bump continued to grow. While it became more prominent, I became more self-conscious of it. Then, my employer warned that our insurance would be changing in a month. Premiums and co-pays would soon be significantly more expensive. I decided to have the bump re-evaluated; If it was going to cost more in a short matter of time, I'd rather go before the new plan took effect.

I saw my doctor who measured it again. It had grown to 1.5 cm. She referred me to dermatology. But if I was going to see the dermatologist, I'd have to wait 5 months! She scheduled me with the dermatology nurse practitioner instead...I could get in the next day. She might even be able to "take care of it" that day. I went in hopeful, but oops. They made a mistake in scheduling. The appointment was the following day. The next day, the nurse practitioner confirmed that it was, indeed, a sebaceous cyst. She offered to cut and drain it at the same visit, or schedule me with the doctor the following week to have it removed.

Drain it? Or remove it?

I asked for more information. She explained that a sebaceous cyst is a fluid-filled sac underneath the skin, containing a protein. It often forms following a skin trauma at the hair follicle. Skin cells that are normally found on the surface, find their way into the swollen area where they slowly continue to grow inside the sac. She asked if it had ever become infected, seeping out a foul-smelling yellowish fluid. No, thank goodness!

She said draining the cyst would get rid of the bump, but the sac would remain and could possibly re-fill. The other option, excision, would surgically remove the entire sac. And the cyst would not recur, although patients with a predisposition to cyst formation, may develop cysts near the same area in the future.

I didn't want the sac to re-fill! I decided to get rid of it altogether. She scheduled me for my "procedure" and I returned to the office the next week.

My dad came with me for support and waited in waiting room. The tech brought me to an operating room, had me lay on a bed with a bright light dangling over my head. She strapped electrodes to my calves (wish I had known that was coming...I would have shaved my legs), and had me point to the bump. She got out a razor and shaved a small section of hair around it.

The doctor came in and had the tech numb the area. It felt like liquid was running down the back of my head. He said that's a normal sensation, but that there was nothing there. He asked a few questions to make sure the area was numb, and he went to work. Slice. Open. Scrape. Remove. Close. Stitch the inside. Staple the outside (x7). Clean. The whole time, he talked to me and explained the procedure. By the size and texture, he said it looked like the cyst had been there for a long time...maybe 10 years. And even more interestingly, he said it wasn't just one cyst! There was a sizable cyst which was "attaching itself to surrounding structures" with a cluster of much smaller ones "like grapes hanging onto each other" all around it. I asked to see it when they were done, and that was a perfect description. They were grayish-white balls, and the largest one was mis-shapen like a candy corn.

In all, the visit lasted about 10 minutes. My dad took me home with a big white bandage on my head. I wouldn't be able to take it off for 24 hours (my students would surely notice). Each day, the area needed to be cleaned, and in 10 days I would return to have the 7 staples removed.

And now, a month later, I'm bump free. It's still scabbed over and healing, but I'm so glad that it's gone. And I just hope that I'm not one of those people who are "predisposed" to the sebaceous cyst.

Thursday, September 13, 2012

The Duquesne Incline

At this time last month, my husband came home late from teaching a night class and asked if DT and I would like to join him for an impromptu mini-getaway to Pittsburgh. We'd have to leave in less than 10 hours. He and a coworker had planned to be part of a Q&A panel at the University of Pittsburgh on the topic of effective implementation of pre-engineering programs in high schools, and his coworker suddenly backed out of the trip. Travel and lodging were covered.

How could I say no? I was giddy at the opportunity to get away as a family. So bright and early, we loaded a day's worth of clothes and swimsuits for the hotel, and drove the six hours from South Bend to Pittsburgh. In all we would spend only 24 hours there before heading home, but we would be sure to find all the fun we could.

While my husband attended to his Q&A business, DT and I took a map of the Oakland area from the concierge and began wandering on foot.

Hungry from the long drive, we aimed for "The Original Hot Dog Shop."
I ordered "The Superdog." Warning: This dog comes with 2 thick slices of bacon and cheddar cheese.

With full tummies, we putzed around Oakland and eventually wound up back at our hotel, enjoying the pool, and searching the web for something to do in the morning after check-out.

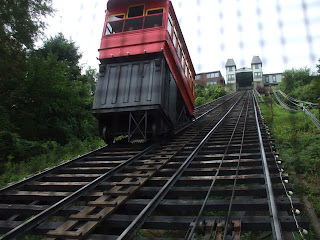
And here's what we found! The Duquesne Incline. (view from the parking lot below)

Opened: 1877. Cost to Build: $47,000. Length of Track: 794 feet. Elevation: 400 feet. Grade: 30.5 degrees. Speed: 6 miles per hour. Passenger Capacity: 18 per car.

Going up!
That one's going down at the same time, right next to us.
DT checking out the view from the top, just outside the incline drop off.
Both of my boys. You can see the convergence of three rivers from here. Just don't ask me now which ones they were.
Here's a view of the incline from the top. What was cool at the top was that you can look through a peak hole and watch working parts of the incline inside the drop off booth. We're talking huge gears! And you can learn the history of the incline and view pictures of it being installed and used over time.
Once you leave the drop off booth, there's not much to do. But if you walk to the top of Mount Washington, you'll find this cool monument. We didn't plan on seeing it, so it was a nice educational bonus! It's called Points of View and it depicts a meeting between George Washington and Seneca Indian leader Guyasuta.
I hope you can zoom in to read this plackard that goes with the monument.
DT and I overlooking the city, just behind the Points of View monument at the top of Mount Washington. DT did not like having this picture taken. Nor did he enjoy his travel up or down the incline. This is when we discovered how truly afraid of heights he is!

Thank you, Pittsburgh, for a wonderful day.

Tuesday, September 4, 2012

Ninjago Party Ideas

I wish the best of luck to all of you who may be planning a LEGO Ninjago theme birthday party! My last post has had quite a lot of traffic. So, you're not alone! Kids love Ninjago. The problem is you're going to have to be a DIY'er. If you want to see how to make a few of your own Ninjago party supplies, please go back to my older posts. You'll see my Ninjago invitations, balloons, and party cups.

My search for Ninjago party ideas began on-line. I found several people pinning LEGO party ideas. But I didn't see many ideas specific to Ninjago, except for cakes (and those looked insanely difficult for the novice DIY'er). So, I took what I found from a hodge podge of themed birthday parties and basically adapted the ideas to fit our Ninjago theme.

Some of my ideas turned out better than others...as you'll plainly see. But overall, I was pleased with the results. And more importantly, so was my son. A Ninjago theme was undeniably present at his 9th birthday party.

I recognize the fact that my creations can be improved upon, but I definitely don't plan on hosting another Ninjago party. So please use and adapt to your heart's desire. Your Ninjago enthusiast will love you for it! (And he'll probably even want to help.)

9x13 LEGO brick cake.

At the Betty Crocker website you can watch a How-To video on making a LEGO brick cake. Instead of putting connectors (marshmallows halves) on the middle section, I posed two of my son's Ninjago spinners on top of the frosting like they were battling in the Spinjitsu arena.

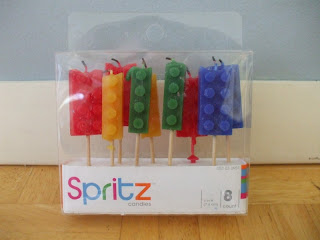
LEGO brick candles.

I was ecstatic to find these at Target in the party supply area. With the Ninjago spinners offset on the center third of the cake, I put the candles on the other side.

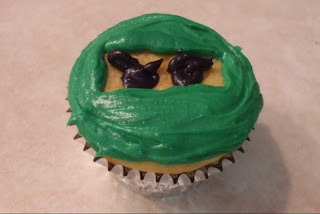
Ninjago cupcakes.

I'm not likely to ever try cake decorating again! My intentions were good, but I can't control the decorating tips. At least I used a yellow cake mix, allowing me to reveal the ninjas' faces without having to frost those too.

LEGO utensil holder.

Here's a great way to get your little ninja involved in the party preparation!

Guess how many Ninjago pieces?

Get the party started with a nice, quick guessing game. While the kids are eating, give them each a slip of paper and pass around the jar of random LEGO or Ninjago pieces. After they jot down their guesses, read them off in order of farthest from the actual number of pieces to the closest. Let the excitement build and finally announce the best estimation and the lucky winner.

LEGO mini-figurine giveaways.

These make great prizes for game winners or can be shared in lieu of goodie bags for guests. What's great is that each mini-fig comes in a sealed non-see-through bag. So, opening one feels like opening a present. You never know which mini-fig you're going to get.

Pin the Sword on the Ninja.

Find a good image of your child's favorite Ninjago character online and print, along with enough golden weapons for each child to have his own for a game of Pin the Sword on the Ninja. You know the the rest. Blindfold, spin around once or twice, and have them try to stick the golden weapon in the ninja's hand. This will be a hit!

Ninjago party table.

Trust me, it's all worth it to see that smile on your birthday boy's face.

Thursday, August 30, 2012

Ninjago Party Supplies

If you've been looking for LEGO Ninjago party supplies, you're probably getting very disappointed. Are you finding ANYTHING? Frustrating, isn't it? Certainly no Ninjago party invitations to be found. If you want to see the homemade invitations I made, please go back through my older posts. That's the best I could do.

Ninjago is one of the most popular boys' cartoons right now. It's in it's second season on Cartoon Network. It's the only thing my son talks about these days. So, when he asked for a Ninjago-themed birthday party, I said yes. I thought finding supplies would be easy. It's such a popular show, I'd probably have character options and everything. How wrong I was! I looked at retail and party supply stores, searched on-line, and asked around. Could anybody help? No. NOTHING!

If there was going to be a Ninjago birthday party, there would be no ready-made supplies. This would be a DIY Ninjago party. I put on my thinking cap and started taking notes.

Primary colors, like LEGOS. A store-bought yellow table cloth. Blue napkins, plates, and cups. Balloons in the colors of the main Ninjago characters.

I wasn't satisfied. This was LEGO-ish, but not Ninjago-ish. My son doesn't have an interest in LEGOs. It's Ninjago! We needed something that says Ninjago.

Ninjago cups!

Using a color printer and photo paper, print off as many pairs of 1x3-inch Ninjago eyes as you need. Cut around them. Run them through a Xyron sticker maker. Stick them onto your party cups. And, voila!

Here are the eyes I used.
Ninjago balloons!

Making the cups was so easy that in true ninja spirit, I decided to personalize the balloons too! Print, cut, and stick as many 2x6-inch eyes as you need. I made 10 total. Two each of the 5 main ninjas' colors. GREEN: Lloyd, power of Creation. BLUE: Jay, ninja of Lightening. BLACK: Cole, ninja of Earth. RED: Kai, ninja of Fire. WHITE: Zane, ninja of Ice.

Your guests will love it when you tell them they get to take one home from the party.

What I didn't count on was a "helium shortage." Who would have guessed? I was still able to buy my helium-quality balloons at our local supermarket, but they came on plastic posts, which wasn't all that bad. Maybe even made it easier to stick the eyes on.

Wednesday, August 29, 2012

Conner Prairie

Day 6: Conner Prairie

Final stop... Fishers, Indiana. Our week-long, kid-friendly romp around Kentucky and Indiana was coming to a close. It was Sunday, and we had thoroughly enjoyed every minute of this vacation.

The Huber van pulled in to Conner Prairie Interactive History Park. Dad found a nice shady spot to park. Not a close-to-the-entrance spot, but when has he ever cared about that? He wanted to keep the car cool like he always does. And just as always, he backed into his prime spot so we could pull out easily when we were done.

No line to wait in. We had Conner Prairie to ourselves. For a little while anyway. We bustled around this 1836 prairie town, talking to townspeople, bartering with store clerks, trying new (or maybe old) recipes, and learning how to make a go of it on the prairie.

Try a prairie trade before even going out to prairie town. DT loved the old-fashioned store. Prices were reasonable too. Or maybe he was just giving his dear mom a break.
Spin the wheel to find your fate in prairie town. The trade you land on determines your job for the day. You'll learn what was it like to be a craftsman, a farmhand, a cook, or housekeeper in the 19th century.
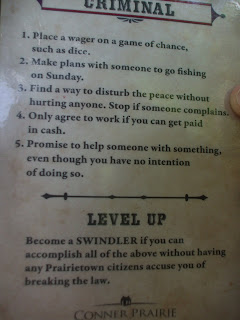
Or, you could just end up the town criminal!
DT's swindling list of must-do's.
My little criminal! He's so proud that he just disturbed the peace without harming anyone. Number 3 on his list of must-do's. Check.
Experiment with the hand tools of the 1836 prairie.
Try your hand at candle dipping. Patience required!
Learn an old-fashioned family game. (Notice the wigwams in the background. DT loved the Lenape Indian Camp since he had just made a wigwam diorama for a 3rd grade school history project.)
And be sure to explore the prairie's barn. Pet the baby lambs, goats and calves, or hold a newly hatched chick. They're just so stinking cute!

What a great learning experience! I wish we could have taken pictures during the 1863 Civil War Journey. With performers in period costumes and incredible hologram video projection, it's a 4-D experience that puts you in the middle of General John Hunt Morgan's raid on Indiana. You'll be asked to defend the state from rebel raiders. It's pretty exciting!

I must say it again... Thank you Mom and Dad for planning this vacation for DT and I. We loved it. And we'll always remember this time with you!

Sunday, August 26, 2012

LEGO Travel Adventure & More

Day 5 (continued): Children's Museum of Indianapolis, LEGO Travel Adventure

My parents executed an amazing week-long getaway that had already taken us to Whitewater Canal, Clifty Falls State Park, Shaker Village at Pleasant Hill, Jackson county and Renfro Valley Kentucky, and Fort Boonesborough.

And now we were spending a day at The Children's Museum of Indianapolis. For the sake of time and space, I split our museum stop into two posts. If you're interested in pictures from the Dinosphere exhibit or the Chinese Terra Cotta Warriors, you'll have to go back to my previous post.

There really is so much to see!

If you have a LEGO lover, be sure to hit the LEGO Travel Adventure. This was one of DT's favorite exhibits. There's a bit of history, but mostly just fun!


At one o'clock visitors gathered on every floor to watch this enormous water clock drop 70 gallons of a water/methyl alcohol mixture that had been climbing all day, to accurately reflect the time. With more than 40 specially blown glass pieces, they say it stands at 26.5 feet tall and is the largest water clock in North America. It's an amazing focal point of the museum.
Fireworks of Glass. I'd say this is an appropriate name for the display. It's a 43-foot tall tower that rests on top of the glass ceiling of the lower level of the museum. You can circle it from the museum's ramps and view it from all sides, and even from underneath! You can't possibly comprehend the enormity of this sculpture from this picture, but try to imagine more than 3,200 individually blown, brilliantly colored, smooth, twisted glass horns and goosenecks.
Plan on spending some extra time here in Science Works. There's a construction site where you can design and build simple machines and experiment with physical science. DT tackled this architectural feat and was so proud to put that final keystone in!
If you have a science kid like DT, you'll be here for awhile. This hydrology feature was one of his favorites. He had way too much fun adding dams, changing water levels, and sending his boat down this 30 foot winding water table.
Sorry for the terrible quality of this photo (behind plexiglass), but for the amount of time DT spent here, I'd better include this Rube Goldberg machine. It's like The Song That Never Ends. It was torture for him to be pulled away.

This visit to the museum was a hit! And better yet, we ALL enjoyed it. Plan on loving it just as much as your kids do!

If you're ready to plan your trip, click here:
http://www.childrensmuseum.org/


Monday, August 20, 2012

Children's Museum of Indianapolis

Day 5: Children's Museum of Indianapolis

What a cool entrance to the museum!

If you're in Indianapolis, you've got to visit the children's museum. We happened to find some great coupons online which made it very affordable, but we certainly would have gotten our money's worth even if we had paid full price. There was just so much to do that a full day wasn't enough to take it all in. So we priortized and saw all that we could.

Link to the museum website here: http://www.childrensmuseum.org/

First stop...Dinosphere. Cretaceous Period. 65 million years ago.
This exhibit is impressive. It's one of the largest displays of real juvenile and family dinosaur fossils in the United States, and includes a functioning lab and hands-on activities for the kids.
A close-up view of a tiny dinosaur.
Second stop...Treasures of the Earth by National Geographic. It was an accidental discovery. In 1974 a group of Chinese farmers in danger of losing their crops to dry conditions, began digging a well. After digging 13 feet deep, the ground was still dry. A shovel struck something hard. And they discovered a human body made of baked clay!
An excavation of the site unearthed what many call the Eighth Wonder of the World. A full army of terra cotta warrirors of China's first emperor. Nearly 8,000 of them.
The exhibit shows how archaeologists unearthed and pieced back together the life-sized army, unraveling the mystery of the warriors. Each, individually sculpted, with unique facial features, hairstyles, and clothing details.
Although there is some debate about the origins of the Terra Cotta Warriors, most archaeologists believe they were created as part of a massive underground city for emperor Qin. To guard and protect him for eternity due to the proximity of his burial mound.
We explored two more Treasures of the Earth (the Tomb of the Ancient Egyptian and the Shipwreck of Captain William Kidd), but I I'll limit myself to this. And next time I'll share some pics from the LEGO Travel Adventure exhibit. I wasn't planning more than one entry on any single vacation stop. But clearly, the museum was a big hit!

Val's Tunes


Get a playlist! Standalone player Get Ringtones